
Honey Oat Gluten Free Sourdough Bread in the Bread Machine
This soft, chewy and healthy sourdough bread is easy to make with the help of your bread machine. It’s dairy free, nut free and gluten free. The honey in the recipe cuts through the tangy taste of the sourdough, so if you don’t love the flavor of sourdough, you’ll enjoy this gluten free sourdough bread! It’s delicious as toast, or paired with soup and salad. Plus, there’s no dirty dishes and bowls to wash, just add your ingredients to the bread pan and let it do the kneading, rise time and baking for you!
Why sourdough?
Sourdough bread is amazing for your health and digestion by breaking down the phytic acid in the grains and making it easier to digest and assimilate the vitamins and minerals in the bread. That is very important with grains like rice and oats because they need the fermentation process to break down the phytic acid.
Another benefit in sourdough is the money-savings!
You won’t need to buy yeast ever again! It is the gift that keeps on giving! Just add equal parts of gluten free flour (like organic brown rice flour) and filtered water and it “eats” the grain and breaks it down.
It’s actually a simple process to maintain an active sourdough starter. People want to complicate it and make it sound super confusing, but it’s not.
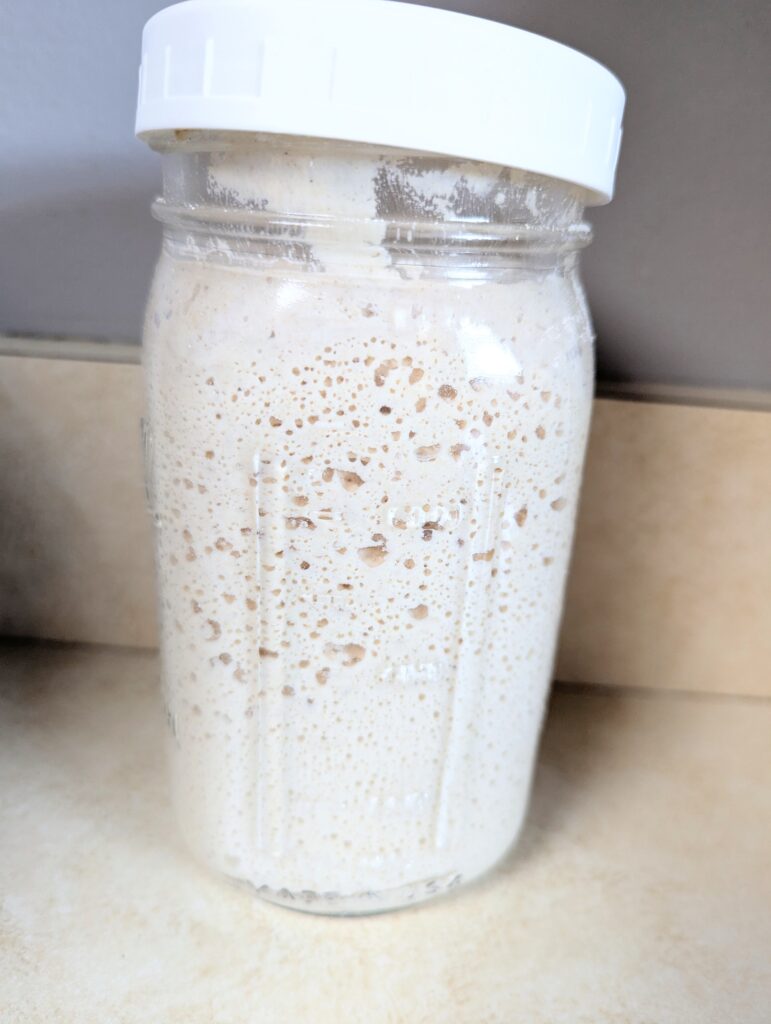
So here’s the jist about sourdough: If you are going to make something with it, you’ll need to “feed it” the morning of or the night before and wait for it to get bubbles in the jar. Then, it’s considered active. If it’s unfed, it’s considered a “discard” recipe. That’s it.
How do you feed your sourdough starter?
This is assuming you have a starter or were given a starter. Now what? The starter needs to have 2 things: gluten free flour, like brown rice, white rice, millet, or sorghum AND filtered water. You will need to feed it equal parts gluten free flour and water. You want the consistency of the starter to be like a thick pancake batter. Feel free to tweak it a bit. Seems too thick, add more water. Seems too runny, add more flour.
How much do I feed it?
I typically feed it as much as I am going to need in the recipe. So if my recipe calls for 1/2 cup of starter, I will feed it a 1/2 cup of gluten free flour and 1/2 cup of water. If you are going to use it for more recipes in the next day or 2, feed it more. Let it sit on the counter and then wait for it to get bubbly and rise in your jar. I use a quart mason jar with a loose lid. You want to let it get exposed to the air- no tight fitting lids.
What if my sourdough isn’t super bubbly? Can I still use it in the recipe?
Yes, you can. It just means it may take it longer for your bread to rise in the recipe. So, you fed your sourdough the day before and it’s looking rather flat and not many bubbles? Yes, you can still use it. I use mine that way all of the time and still get great results with breads and cookies. Once you make the bread dough, that sourdough starter is excited because you are feeding it and it’s going to activate itself again. I hope that makes sense.
What if I won’t use it for awhile?
If you know you won’t be making anything with it for awhile, feed it some gluten free flour and water and then place it in the fridge with a tight fitting lid. It will keep in the fridge for weeks. I’ve been known to neglect mine for a month and it’s still fine. Just pour off any water that floats to the top and feed it some gluten free flour and water and leave it on the counter at room temperature to reactivate it.

Let’s get to the recipe:
Grab your bread machine and take the pan out. You’ll be adding the ingredients in the order listed.
- Avocado oil or other neutral flavored oil
- Warm water
- Honey
- Psyllium Husk Flakes- don’t skip this ingredient, it’s essential for helping the bread to be soft and not dry
- Eggs, chicken or duck (both work well)
- Active sourdough starter (ideally fed the night before or the day of)
- Quick cooking Gluten Free Oats
- Brown rice flour- freshly milled or prepackaged
- Tapioca Starch
- Xanthan gum
- Sea salt
Grab your ingredients, bread machine and let’s get started making the honey oat gluten free sourdough bread!
First, add 1/4 cup avocado oil to the the bottom of the bread pan.
Next, add 1 1/2 cups of warm water (you may need 2 T-1/4 cup more to get the right consistency while the dough is kneading)
Next, add 3 Tablespoons honey
Then, add 2 Tablespoons psyllium husk flakes
Next, add 3 large eggs, equally 3/4 cup
Now, add 1 cup of active GF sourdough starter, ideally fed the night before you bake this or the same day, a 3+ hours before so that it has time to get bubbly.
Next, add 1/4 cup quick cooking GF Oats.
Then, add 2 1/2 cups brown rice flour and 1 cup tapioca starch
Finally add, 1 tsp xanthan gum and 1/2 tsp sea salt.
Place the pan into your bread machine. This will make a 1.5 lb loaf.
Turn on the French Bread or Gluten Free setting.
You want the setting with the longest rise times for baking gluten free bread. My machine is for 3 hours and 40 minutes for both the French bread setting and the gluten free setting. Set to 1.5 lb loaf size.
Next, press start and it will begin to stir and knead your dough.
Here’s where you need to scrape down the sides and possibly add more water.
The dough should be the consistency of thick pancake batter. If the dough is dry or crumbly add 2 tablespoons of water at a time until it reaches the consistency of thick pancake batter.
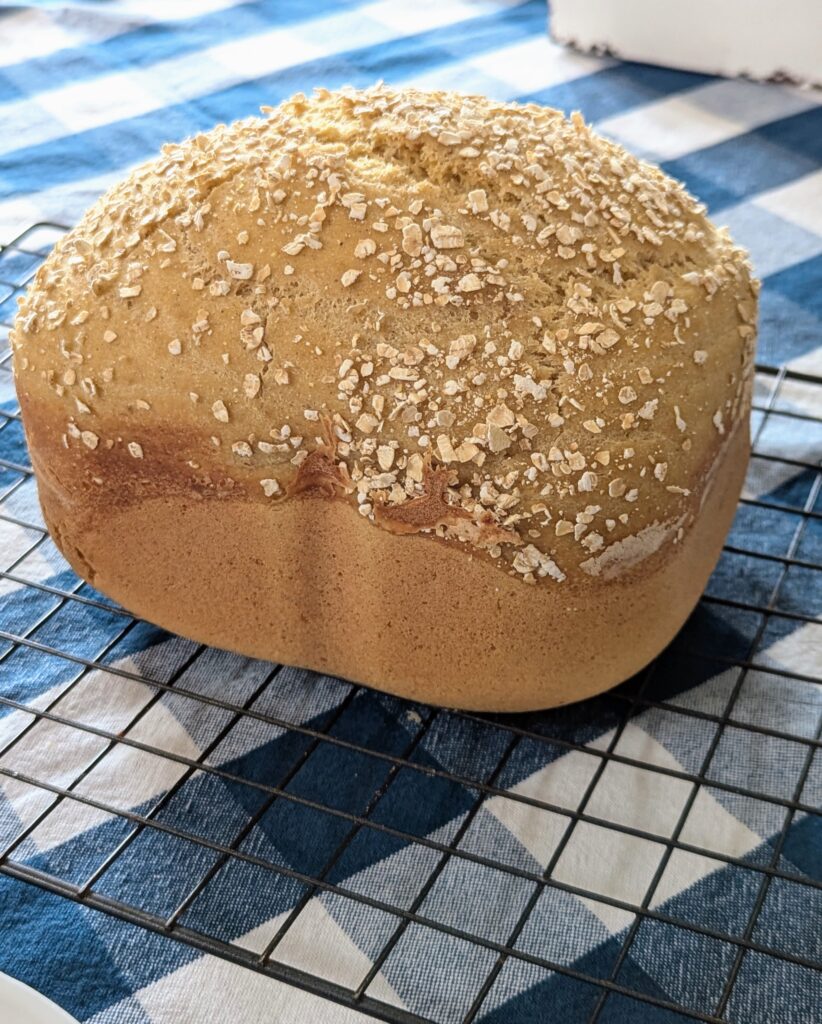
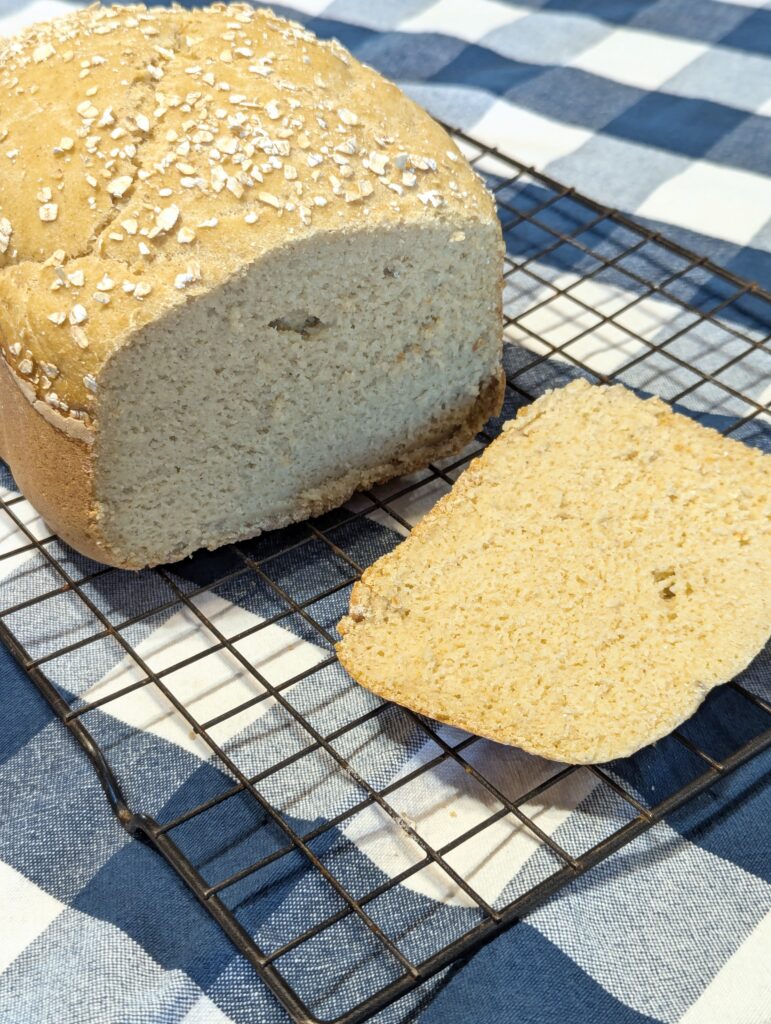
Once the dough reaches the consistency of thick pancake batter. Close the lid and let it go. It will rise, knead, rise again, knead, rise once more and then bake. The baking time is typically about 1 hour. Sometime near the beginning of the baking time you can add 1 Tablespoon of the quick oats, just sprinkle it on top of the bread. It’s not necessary for the bread, but it makes it look really pretty.
When the bread is done, use hot pads or oven mitts and take it out of the bread machine. Next, gently dump the bread out of the bread pan onto a cooling rack. Allow to fully cool, typically 3 hours or so. Once it is fully cooled, slice and enjoy! Don’t cut into warm bread! I know it’s tempting, but you run the risk of a gummy consistency of the bread if it’s not fully cooled.
Storage:
Store your cooled bread in an airtight container for 2-3 days at room temperature or 3-5 days in the fridge. For longer storage, slice and freezer for up to 6 months.
I hope you love my Gluten free honey oat sourdough bread!! Comment below if you made it or need any help understanding baking with gluten free sourdough.

Honey Oat Gluten Free Sourdough Bread in the Bread Machine
Equipment
- Bread Machine with 1.5 lb loaf and French bread setting or Gluten Free setting
Ingredients
- 1/4 cup Avocado oil or other neutral flavored oil
- 1 1/2 cup Warm water
- 3 Tablespoons Honey
- 2 Tablespoons Psyllium Husk Flakes
- 3 Eggs equally 3/4 cup
- 1 cup Active sourdough starter ideally fed the night before or the day of
- 1/4 cup Quick cooking Gluten Free Oats
- 2 1/2 cups Brown rice flour- freshly milled or prepackaged
- 1 cup Tapioca Starch
- 1 tsp Xanthan gum
- 1/2 tsp Sea salt
Instructions
- Grab your ingredients, bread machine and let’s get started!
- First, add the avocado oil to the the bottom of the bread pan.
- Next, add the warm water (you may need 2 T-1/4 cup more to get the right consistency while the dough is kneading)
- Add the honey
- Then, add the psyllium husk flakes
- Next, add 3 large eggs, equally 3/4 cup
- Now, add 1 cup of active GF sourdough starter, ideally fed the night before you bake this or the same day, a 3+ hours before so that it has time to get bubbly.
- Next, add the quick cooking GF Oats.
- Then, add the brown rice flour and tapioca starch
- Finally add the xanthan gum and sea salt.
- Place the pan into your bread machine. This will make a 1.5 lb loaf.
- Turn on the French Bread or Gluten Free setting.
- You want the setting with the longest rise times for baking gluten free bread. My machine is for 3 hours and 40 minutes for both the French bread setting and the gluten free setting. Set to 1.5 lb loaf size.
- Next, press start and it will begin to stir and knead your dough.
- Here’s where you need to scrape down the sides and possibly add more water.
- The dough should be the consistency of thick pancake batter. If the dough is dry or crumbly add 2 tablespoons of water at a time until it reaches the consistency of thick pancake batter. Add this water while the machine is kneading your bread dough. It's fine to open the lid until it is baking.
- Once the dough reaches the consistency of thick pancake batter. Close the lid and let it go. It will rise, knead, rise again, knead, rise once more and then bake. The baking time is typically about 1 hour. Sometime near the beginning of the baking time you can add 1 Tablespoon of the quick oats, just sprinkle it on top of the bread. It’s not necessary for the bread, but it makes it look really pretty.
- When the bread is done, use hot pads or oven mitts and take it out of the bread machine. Next, gently dump the bread out of the bread pan onto a cooling rack. Allow to fully cool, typically 3 hours or so. Once it is fully cooled, slice and enjoy! Don’t cut into warm bread! I know it’s tempting, but you run the risk of a gummy consistency of the bread if it’s not fully cooled.


